
A finger whistle is one of those skills that looks like a genetic gift: some people casually produce a whistle that stops traffic, while the rest of us blow air through our hands and get nothing. Here is the good news — it is not a gift, it is a technique, and it breaks down into five learnable steps.
This guide walks through exactly where your fingers go, what your tongue should be doing (this is the part nobody explains properly), and how to troubleshoot the “all air, no sound” phase that makes most people give up.
Why the finger whistle works
A whistle is just air being forced over a sharp edge so that it vibrates. In a regular pucker whistle, your lips form the hole. In a finger whistle, your fingers do three jobs at once:
- They hold your lower lip taut over your bottom teeth.
- They pin your tongue back, folding it so its underside faces forward.
- They shape a small, firm opening for the air to rush through.
That folded tongue creates a bevel — an edge for the air to split against — and the small opening concentrates the airflow. More pressure through a smaller, well-shaped hole is what produces that piercing, stadium-grade sound. Once you understand that your fingers are building a small instrument inside your mouth, every step below makes sense.
Step 1: Choose your finger combination
There is no single correct combination. All of these work, and the physics are identical:
- Two index fingers (one from each hand) — the easiest for most beginners, because it is symmetrical and easy to adjust.
- Index + middle finger of one hand, forming an “A” shape — the classic one-handed look.
- Thumb + middle finger of one hand, forming a ring — compact, popular once you have the basics down.
- Two pinkies — works great for people with larger hands or fuller lips.
Start with two index fingers. You can switch to a one-handed style later; the skill transfers completely.
Step 2: Position your lips
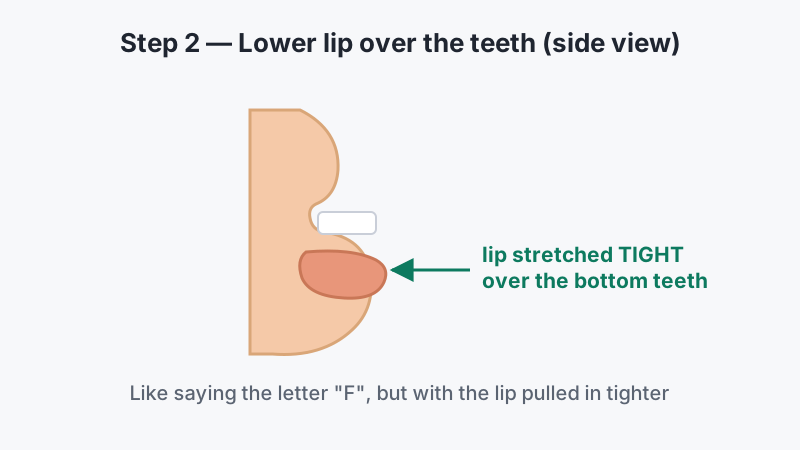
Tuck your lower lip inward so it stretches over your bottom teeth, like you are about to say the letter “F” but with the lip pulled in tighter. Your upper lip stays relaxed and will rest over your fingers in the next step.
The lower lip is your whistle’s foundation. If it is loose or slips off your teeth while you blow, the air escapes without vibrating and you get nothing but breath. Taut lip, always.
Step 3: Fold your tongue back with your fingers
This is the step that separates people who whistle from people who blow air.
- Stick the tip of your tongue out slightly.
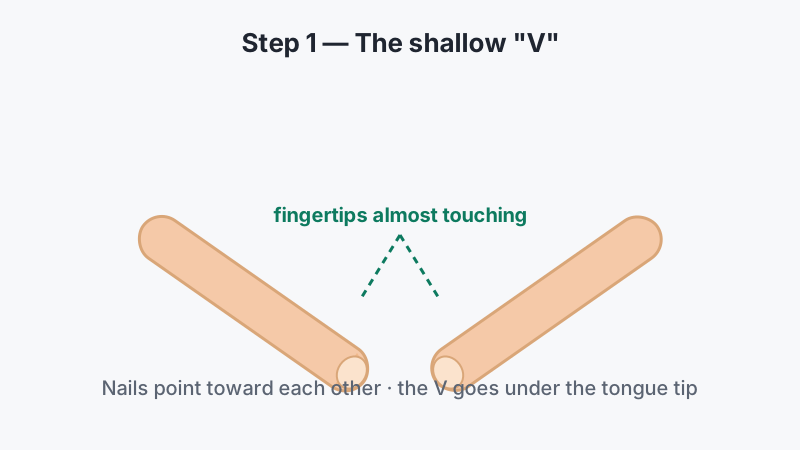
- Place your two fingertips under the tip of your tongue, angled toward each other in a shallow “V”, nails pointing at each other.
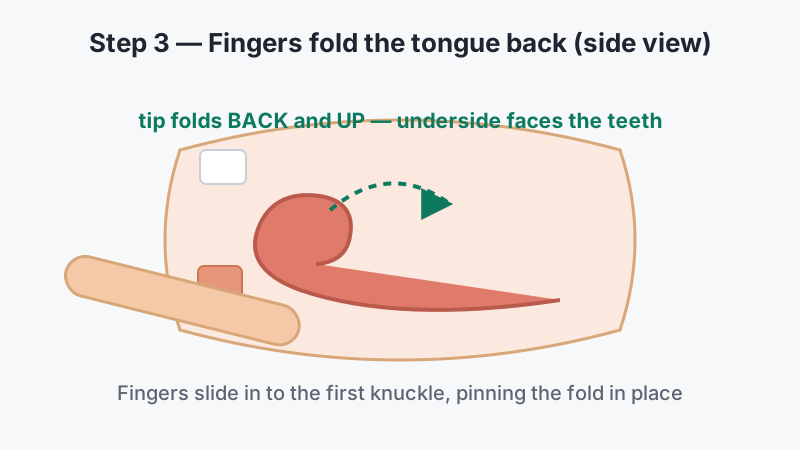
- Push your tongue back and slightly up, folding it so the first quarter of your tongue bends backward. The underside of your tongue tip should now face your front teeth.
- Slide your fingers in up to roughly the first knuckle. Your upper lip closes over them.
Your tongue should feel bunched and folded, not flat. If your tongue is lying flat in your mouth, no amount of blowing will produce sound.
Step 4: Seal everything except the hole
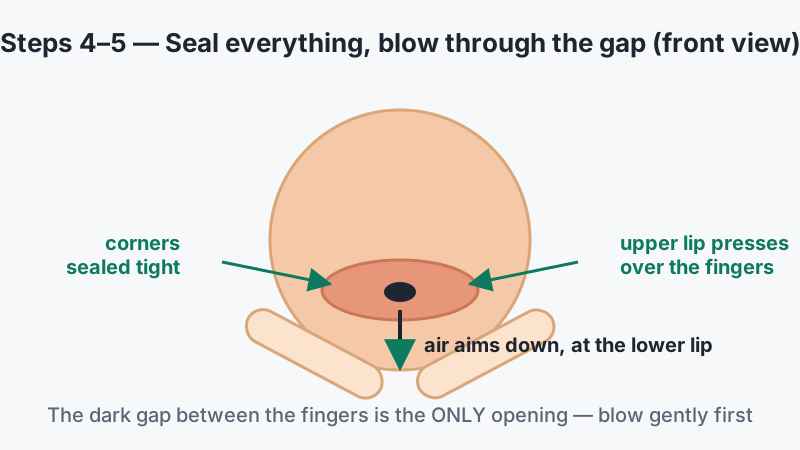
Close your mouth firmly around your fingers. The only opening should be the small gap between your two fingers, just above your lower lip. Check for leaks:
- The corners of your mouth must be sealed tight around your fingers.
- Your upper lip presses down over your fingers.
- Your lower lip stays stretched over your bottom teeth.
A leak anywhere is like a hole in a trumpet — the pressure drops and the whistle dies. Beginners lose most of their air at the mouth corners without noticing.
Step 5: Blow gently, then find the angle
Take a comfortable breath and blow gently — much more gently than you think. You are not trying to force a sound; you are searching for it.
While blowing softly, make tiny adjustments:
- Angle your fingertips slightly deeper or shallower.
- Tilt the direction of the air a little more downward, toward your lower lip.
- Adjust how far back your tongue is folded.
You will pass through a phase of pure breathy noise. At some point, a hint of tone appears inside the airy sound — a faint, hollow note. That is the signal. Freeze your position, memorize it, and only then start adding more air pressure. Volume comes from pressure applied to a correct position, never from blowing harder at a wrong one.
The four mistakes that keep people silent
- Blowing at full power from the start. Maximum air through a wrong shape is just noise, and it makes you dizzy. Find the tone quietly first.
- Flat tongue. If your fingers are just resting in your mouth without folding the tongue back, there is no edge for the air to split against. The fold is the whole trick.
- Air leaking at the corners. Even a small leak kills the pressure. Squeeze your lips around your fingers like a drawstring.
- Quitting during the airy phase. The breathy-noise stage is not failure — it is the stage right before success. Everyone who whistles passed through it.
A practice plan that actually works
- Days 1–2: Two or three sessions of 5–10 minutes. Goal: any hint of tone inside the air sound. Stop if you feel lightheaded — short sessions beat long ones.
- Days 3–5: Reproduce the tone on purpose. Put your fingers in, find the position, get the note within a few seconds. Consistency over volume.
- Week 2: Add air pressure gradually and work on volume. Try holding the note for 2–3 seconds. This is when the whistle starts getting genuinely loud.
- After that: Experiment with one-handed combinations, or try changing pitch by adjusting how deep your fingers sit.
Practice in front of a mirror at least once — most people are surprised to see their lower lip slipping or their fingers sitting shallower than they thought.
Quick reference
| Element | Correct position |
|---|---|
| Lower lip | Stretched taut over bottom teeth |
| Fingers | In a shallow “V”, inserted to the first knuckle |
| Tongue | Tip folded back and up, underside facing forward |
| Mouth corners | Sealed tight, no leaks |
| Air | Gentle until tone appears, then add pressure |
The finger whistle rewards patience disproportionately: the difference between silence and a whistle you can hail a cab with is usually just a few millimeters of tongue position and a week of ten-minute sessions. Once your muscles memorize the shape, you will never lose it — it becomes as automatic as snapping your fingers.